January 2011 archive

Using LESS To Create Dynamic Stylesheets with Node.js

Have you been working with Cascading Style Sheets (CSS) and found yourself wishing you could make those sheets more, oh, dynamic? Like, for instance, including variables so that you could easily change colors or spacing throughout a stylesheet? There are a number of solutions out there to do this, but one I stumbled upon recently is “LESS“. Here’s a graphic from the LESS site that shows exactly this usage with variables:

less.jpg

You can also do some very cool things with easily nesting rules and creating functions that can calculate values for other rules.

All in all it looks very cool… and it can run either in a client browser or, of more interest to me, server-side using Node.js. I have a site idea where this just might come in handy…

P.S. Any other modules for Node.js for doing stylesheet creation that you all like?

Meet the Author and Discuss UC Security – Next Week In Miami

As I mentioned on both the VOIPSA blog and my Disruptive Telephony site, I'll be in Miami next week, February 2-4, speaking at the SIP Trunking Workshop and Cloud Communications Summit about Unified Communications security.

If you are there at any of the events in Miami (my schedule is online), please do say hello... and if you'd like to meet, please send me an email or contact me on Twitter.

P.S. I may have a few books with me... ;-)

Slides: Node.js, Event Loops and How To Stop Writing Spaghetti Code

As a comment to my recent post on understanding event-driven programming, Tom Hughes-Croucher left a pointer over to a presentation he gave last year about Node.js and event-driven programming. I enjoyed his style and would have liked to hear him give it in person… here it is embedded for anyone else looking to understand more on Node.js and the world of the Event Loop:

Test Out Python… Directly In Your Web Browser

Pretty cool little site to test out python directly inside your web browser (found via Hacker News):

http://syntensity.com/static/python.html

You just type in some python code and press the “Execute” button. Now, sure, it doesn’t have support for much outside the very core language… and you could get all of that by simply flipping to a terminal window and using python from the command line.

Still, it’s a fun way to be able to show people new to python what they can do… and a cool proof-of-concept of running python directly inside your web browser!

Emscripten_ Python.jpg

Node.js, Doctor’s Offices and Fast Food Restaurants – Understanding Event-driven Programming

The Frying Dutchman

Are you struggling to understand “event-driven” programming? Are you having trouble wrapping your brain around “blocking” vs “non-blocking” I/O? Or are you just trying to understand what makes Node.js different and why so many people are talking about it? (and why I keep writing about it?)

Try out one of these analogies…

The Doctor’s Office Reception Line Analogy

In the excellent episode 102 of the Herding Code podcast, Tim Caswell relates event-driven programming to standing in the line at a doctor’s office to see the receptionist. Inevitably, at least here in the USA, there are additional forms to fill out with insurance info, privacy releases, etc.

A Traditional Model

In a traditional thread-based system, when you get to the receptionist you stand at the counter for as long as it takes you to complete your transaction. If you have to fill out 3 forms, you would do so right there at the counter while the receptionist just sits there waiting for you. You are blocking her or him from servicing any other customers.

The only real way to scale a thread-based system is to add more receptionists. This, however, has financial implications in that you have to pay more people and physical implications in that you have to make the room for the additional receptionist windows.

Events To The Rescue

In an event-based system, when you get to the window and find out you had to complete additional forms, the receptionist gives you the forms, a clipboard and a pen and tells you to come back when you have completed the forms. You go sit down in the waiting and the receptionist helps the next person in line. You are not blocking her from servicing others.

When you are done with your forms, you get back in line and wait to speak with the receptionist again. If you have done something incorrectly or need to fill out another form, he or she will give you the new form or tell you the correction and you’ll repeat the process of going off, doing your work, and then waiting in line again.

This system is already highly scalable (and is in fact used in most doctor’s offices I visit). If the waiting line starts getting too long, you can certainly add an additional receptionist, but you don’t need to do so at quite the rate of a thread-based system.

The Fast Food Restaurant Analogy

It struck me that this is also very similar to ordering your food at a fast-food restaurant or street vendor.

The thread-based way would be to get to the front of the line, give your order to the cashier and then wait right there until your order was cooked and given to you. The cashier would not be able to help the next person until you got your food and went on your way. Need to service more customers… just add more cashiers!

Of course, we know that fast food restaurants don’t work that way. They are very much event-driven in that they try to make those cashiers as efficient as possible. As soon as you place your order, it’s sent off for someone to fulfill while the cashier is still taking your payment. When you are done paying, you have to step aside because the cashier is already looking to service the next customer. In some restaurants, you might even be given a pager that will flash and vibrate when your order is ready for pickup (My local Panera Bread does this).  The key point is that you are not blocking the receiving of new orders.

When your food is set, the cashier – or someone – will signal you by calling out your name, order number or triggering your pager.  The event of your order being ready causes the person to perform some function/action. (In programming lingo, this would be thought of as a “callback function“.)  You will then go up and get your food.

So What Does This Have To Do With Node.js?

The “traditional” mode of web servers[1] has always been one of the thread-based model. You launch Apache or any other web server and it starts receiving connections. When it receives a connection, it holds that connection open until it has performed the request for the page or whatever other transaction was sent. If it make take a few microseconds to retrieve a page from disk or write results to a database, the web server is blocking on that input/output operation. (This is referred to as “blocking I/O“.) To scale this type of web server, you need to launch additional copies of the server (referred to as “thread-based” because each copy typically requires another operating system thread).

In contrast, Node.js uses an event-driven model where the web server accepts the request, spins it off to be handled, and then goes on to service the next web request. When the original request is completed, it gets back in the processing queue and when it reaches the front of the queue the results are sent back (or whatever the next action is). This model is highly efficient and scalable because the web server is basically always accepting requests because it’s not waiting for any read or write operations. (This is referred to as “non-blocking I/O” or “event-driven I/O“.)

To put it a bit more concretely, consider this process:

  1. You use your web browser to make a request for “/about.html” on a Node.js web server.
  2. The Node server accepts your request and calls a function to retrieve that file from disk.
  3. While the Node server is waiting for the file to be retrieved, it services the next web request.
  4. When the file is retrieved, there is a callback function that is inserted in the Node servers queue.
  5. The Node server executes that function which in this case would render the “/about.html” page and send it back to your web browser.

Now, sure, in this case, it may only take microseconds for the server to retrieve the file, but..

microseconds matter!

Particularly when you are talking about highly-scalable web servers!

This is what makes Node.js different and of such interest right now. Add in the fact that it also uses the very common language of JavaScript, and it is a very easy way for developers to create very fast and very scalable servers.

Do these analogies help? Do have another analogy you use to explain “event-driven programming” or “event-driven I/O”?

[1] While I’m talking about “web servers” here, Node.js lets you write all sorts of different types of servers for many other protocols beyond HTTP. They all have similar issues (blocking vs non-blocking I/O).

Image credit: gerry balding on Flickr

Slides: Using Node.js in a production setting

Interesting set of slides around using Node.js in a production setting – and the choices these folks made around the technology stack they used:

How to use Node.js with IPv6

It turns out to be ridiculously simple. After my testing yesterday, I learned via a comment from Ryan Dahl, that:

all you do is have your Node.js app listen on the IPv6 address.

That’s it.

UPDATE 28 Jul 2014 – As a result of a Reddit thread I’ve seen traffic to this post.  Please do note that I wrote this post in early 2011 when I was experimenting with Node.js.  I’ve not kept up with the state of Node.js and so 3 years later there may be new or better ways to do what I’ve listed here.  Also, please see the comment from Simon Vetter indicating that you don’t need to start up two servers if you simply use “::” as the address. At some point I need to verify that and then update this post.

In a typical application using, say, the “http” module, you will have a line somewhere that says something like:

[js]
server.listen(80);
[/js]

This will bind to your default network interface and address, which, for pretty much all of us, will be our IPv4 address.

To bind to an IPv6 address, you just need to supply the address as an argument to listen(). For example:

[js]
server.listen(80, "2001:db8:1111:2222:3333::51"]
[/js]

So a very basic Node.js app using IPv6 would look like this:

[js]
var http = require(‘http’);

var server = http.createServer(function (request, response) {
response.writeHead(200, {"Content-Type":"text/plain"});
response.end ("Hello World!n");
console.log("Got a connection");
});

server.listen(80, "2001:db8:1111:2222:3333::51");

console.log("Server running on localhost at port 80");
[/js]

Note that as a Node.js app like this will only bind to a single interface and address, this app only listens on the IPv6 address and not on the IPv4 address. To make the app work on both the IPv4 and IPv6 addresses, I need to refactor it a bit into a function that is then called by two different servers that attach to the two network interfaces:

[js]
var http = require(‘http’);

var handler = function (request, response) {
response.writeHead(200, {"Content-Type":"text/plain"});
response.end ("Hello World!n");
console.log("Got a connection");
};

var server6= http.createServer();
server6.addListener("request",handler);
server6.listen(80,"2001:db8:1111:2222:3333::51");

var server= http.createServer();
server.addListener("request",handler);
server.listen(80,"192.0.2.23");

console.log("Server running on localhost at port 80");
[/js]

With that in place, it’s now answering on both the IPv4 and IPv6 addresses.

Now this is for the Node.js base modules… other modules may or may not “just work” for IPv6, too, depending upon what they rely on underneath. Regardless, it’s rather cool that it works so easily on IPv6. Kudos to the Node.js team for making it so simple!

Testing Node.js With IPv6 – First Step, Does It Work?

Given all the writing I’ve been doing lately about IPv6 and about Node.js, it was only natural for me to try combining them. I pay for a VPS over at RapidXen and upon request they will provide you with an IPv6 address block (for free). So I’ve been using it as a base for my IPv6 experiments.

I should note that my home network is set up with IPv6 via a IPv6-to-IPv4 tunnel from Tunnelbroker.net. I previously wrote up how I configured IPv6 this way using an Apple Time Capsule WiFi access point

Testing Apache First

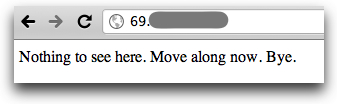
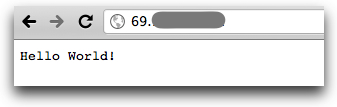
After using IPv6-test.com to verify that I have HTTP connectivity over IPv6 from my system at home, I tested connectivity to my VPS running a stock CentOS 5.5 Apache server. Here was the IPv4 result (and yes, I cover up IP addresses… a certain degree of paranoia comes with the territory of being in the security space):

apachev4.jpg

Here was the same result with IPv6:

apacheipv6.jpg

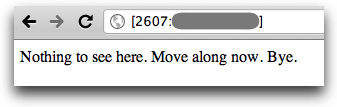
(If you aren’t familiar with using IPv6 addresses in web browsers, you just enclose the IPv6 address in square brackets. The specific browser I’m using is Google Chrome on a Mac, but this should work in all browsers.)

Testing Node.js

The next step was to shut down Apache and start up Node.js. For this experiment, I’m purely using the HTTP module in Node.js and not getting into any of the frameworks. Here’s the very basic code I’m using (also on Github):

[js]
var http = require(‘http’);

var server = http.createServer(function (request, response) {
response.writeHead(200, {"Content-Type":"text/plain"});
response.end ("Hello World!n");
console.log("Got a connection");
});

server.listen(80);

console.log("Server running on localhost at port 80");
[/js]

After firing it up, connecting to the site via IPv4 was no problem:

nodejsipv4.jpg

And this is shown in the console:

bash-3.2# node httpsample.js
Server running on localhost at port 80
Got a connection
Got a connection

Next I tried the IPv6 connection:

nodeipv6.jpg

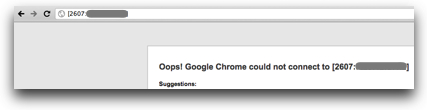
Oops. Predictably, the console log also did not show a new connection. I duplicated the test to make sure there wasn’t anything else funky going on, but had the same issue. Node.js wasn’t accepting HTTP connections via IPv6.

UPDATE: See below for the answer…

Testing the ‘net’ module

I was curious to see if the issue might be with the “http” module or if it was a broader issue. So I fired up a really basic TCP server example:

[js]
var net = require("net");

var s = net.createServer( function(c) {
c.addListener("connect", function () {
console.log("Connection from " + c.remoteAddress);
c.end("Hello Worldn");
});
});

s.listen(8000);

console.log("TCP server running on port 8000")
[/js]

From my Mac, I then tried connecting via IPv4 and IPv6:

$ telnet 69.xxx.xxx.xxx 8000
Trying 69.xxx.xxx.xxx...
Connected to rapidxen.net.
Escape character is '^]'.
Hello World
Connection closed by foreign host.

$ telnet -6 2607:xxxx:xxxx:xxxx::2 8000
Trying 2607:xxxx:xxxx:xxxx::2...
telnet: connect to address 2607:xxxx:xxxx:xxxx::2: Connection refused
telnet: Unable to connect to remote host
$

and found that IPv6 connectivity wasn’t supported in the “net” module.

Just to verify my testing method, I restarted Apache on the VPS box and used the same “telnet -6” command to hit port 80 on the box. I was able to connect and issue HTTP commands without a problem.

In the end…

So it would seem that Node.js doesn’t work with IPv6, which is not terribly surprising given that (Node.js founder) Ryan Dahl indicated in the #node.js IRC chat yesterday that basically no IPv6 testing had been done. Looking in the Node.js ChangeLog, IPv6 support was added in some form back in June 2009:

2009.06.18, Version 0.0.5, 3a2b41de74b6c343b8464a68eff04c4bfd9aebea

Support for IPv6

But without looking at code diffs, it’s not clear to me what exactly was changed to support IPv6.

The next step is obviously to start digging around in code… given that I’m picturing it as a bigger task, I’m not sure when I’ll get the chance to do, but it would be a good excuse to take a look inside the Node.js code.

In the meantime, if anyone else reading this has some Node.js modules they’d like me to test with IPv6, or other ideas around this, I’m glad to help. Just drop me a note or hit me on Twitter.

THE ANSWER

UPDATE:The answer that I couldn’t find anywhere online came in a comment to this post from none other than Ryan Dahl… Node.js DOES work with IPv6, provided you give it the address!

All I had to do to make the original code work with IPv6 was add the IPv6 address to the “.listen(80)”, like this:

[js]
var http = require(‘http’);

var server = http.createServer(function (request, response) {
response.writeHead(200, {"Content-Type":"text/plain"});
response.end ("Hello World!n");
console.log("Got a connection");
});

server.listen(80, "2607:xxxx:xxxx:xxxx::2");

console.log("Server running on localhost at port 80");
[/js]

But of course this only listens on the IPv6 address and not on the IPv4 address, so I needed to refactor the code a bit and run two servers:

[js]
var http = require(‘http’);

var handler = function (request, response) {
response.writeHead(200, {"Content-Type":"text/plain"});
response.end ("Hello World!n");
console.log("Got a connection");
};

var server6= http.createServer();
server6.addListener("request",handler);
server6.listen(80,"2607:xxxx:xxxx:xxxx::2");

var server= http.createServer();
server.addListener("request",handler);
server.listen(80,"69.xxx.xxx.xxx&");

console.log("Server running on localhost at port 80");
[/js]

With that in place, it’s now answering on both the IPv4 and IPv6 addresses!

Many thanks, Ryan, for the answer!

Want The Scoop on Node.js? Listen to Herding Code 102!

herdingcode.jpgWant to understand more about this Node.js thing I’ve been writing about here? Want to learn why people are raving about it? What the community is all about? What you can do with it?

If so, you can head on over and listen to episode 102 of the Herding Code podcast. The Herding Code hosts interviewed Tim Caswell who runs the great How To Node website full of info that can help you get started and learn more about Node.js. The podcast, which runs about 50 minutes, gives some great background to Node.js, explains how it works, discusses some of the many modules used with Node.js, how Node.js is different from other languages… and so much more.

Whether you are just starting with Node.js or have been using it for quite some time, I think you’ll find this interview quite useful and interesting.

Cool stuff…

NodeFu – Free Hosting of Your Node.JS Apps In The Cloud!

NodeFu.jpgHave you been experimenting with Node.JS (as I have) and wished you had a place to host your Node.js apps? If so, you may want to check out NodeFu.com, a new hosting service that just launched today.

Created by my friend and co-worker Chris Matthieu out of frustration with not getting invites for some of the other new Node.js hosting services, NodeFu is hosted up in Amazon EC2 and currently offers free hosting of Node.js apps to anyone interested.

Getting Started

As shown on the NodeFu home page, the process of using NodeFu is fairly straightforward. You request a coupon (an invite) via a commandline curl:

curl -X POST -d "email=your_address@example.com" http://nodefu.com/coupon

When you get an email confirming your invite, you can register an account, provide our ssh public key, etc.

From then on out all deployments happen purely through git commands. You start out by registering a new NodeFu application via another command-line curl command:

curl -X POST -u "testuser:123" -d "appname=myapp&start=hello.js" http://api.nodefu.com/app

NodeFu will respond with some JSON that includes the port number your app will run on and the name of the git repo you will push to. You then just do two git commands:

git remote add nodefu the_url_returned_by_our_api
git push nodefu master

And your NodeFu app will be live at http://appname.nodefu.com. As you work on your app, you just do more commits to your local git repo and then do a “git push nodefu master” when you want to update the live app. Once you push to NodeFu, your app should automagically be updated.

A Very Basic Example

You can see NodeFu in action in a VERY basic form at:

http://dany2.nodefu.com

As I write this post today, that app is literally a super basic “Hello, World” Node.js app. The code is visible up on GitHub at https://github.com/danyork/nodefu-dany2 and hopefully in the next bit I’ll have a chance to turn it into something a bit more involved.

Building Voice and SMS Apps with NodeFu

I’ve also created a Tropo app at http://tropohello.nodefu.com which uses the Tropo WebAPI library for Node.js to return JSON to Tropo.com where you can connect to the app using voice, SMS, IM or Twitter. Right now I only have voice and SMS wired up, but you can try out the app at any of these numbers:

Voice & SMS Messaging: +1-850-462-8472
Skype Voice: +990009369991478810
SIP Voice: sip:9991478810@sip.tropo.com
INum Voice: +883510001827346

Tropo is providing the voice and SMS connectivity and then communicating with my app running over on NodeFu.com. Pretty cool stuff!

Learning More and Trying It Out

You can just go to NodeFu.com to learn more and ask for an invite. Chris has invited 50 people in so far and plans to be giving out more invites over the next few days. It’s notable that Chris has open-sourced the entire codebase for NodeFu, so anyone else could really just download Chris’ code and set themselves up with their own NodeFu-like site:

https://github.com/chrismatthieu/nodefu

Here’s a video explaining what Chris is trying to do:

Other Options

I should note that Chris isn’t alone in coming up with a service like this. The comments to the Hacker News story about Chris’ site (and also the Mashable story) show a range of other Node.js hosting options, including:

… and a couple of others were listed, too, but they seem to offer other forms of hosted JavaScript versus Node.JS hosting.

The key point of all of this is that for those of us experimenting with Node.JS, this is truly a wonderful time to be trying it out, because we now have so many options before us!